How to Upload High Quality Gif on Tumblr
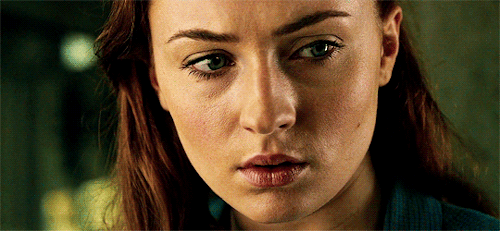
The question people ask me the most on hither besides "are you dead" is how to make gifs and how to make them expect good. And so I finally decided to brand a tutorial how to go from this:
(I know this tutorial is pretty long and I apologize for that, I merely wanted to make a tutorial everyone can understand because when I was a beginner I always wished for more detailed tutorials on this topic.)

to this:
I use Photoshop CC (2017) but I call up other versions are pretty similar to this one. (I own the german version but I'll interpret everything really badly.)
First of all choose the video or movie you want to edit and make sure it's 1080p, this way you'll get the all-time issue. 720p quality should be fine likewise for smaller gifs.
Then yous have to import your video into PS.
File > Import > Video Frames to Layers

Later on that yous take to choose the part you want to import from the video. Brand certain yous employ the aforementioned settings as I do.
"Selected Range Only", "Limit to Every 2. Frame" and "Make Frame Animation"

Delete the frames and layers y'all don't desire to use. Your sheet should now await something similar that:

Now I'm going to select all frames and change the frame rate. I'm using 0,8 for this gif.

I accept absolutely no thought how this push is called in English, information technology has to be "Catechumen to Video Timeline" or something. Just click the button on the left and make certain all of your frames are selected.

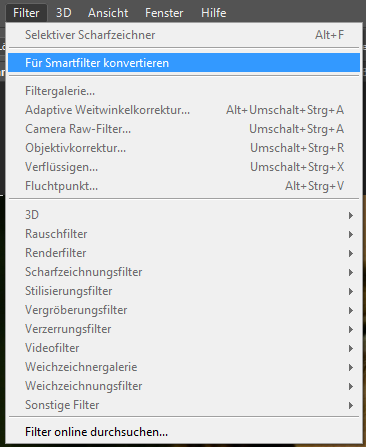
Now select all layers
Select > All Layers
and convert them.
Filter > Convert Layers to Smart Object
Of course the gif is still manner also big, then we have to resize it earlier we start editing it. (I recommend using the size 540 x 250 for big gifs and 268 x 150 for small ones.)
Prototype > Paradigm Size

The imported size my gif has is 1920 x 800, if I now alter the width to 540 the height automatically changes to 225. But that's not the elevation I want so I accept to go back and ingather the gif earlier resizing it.

Utilise "Ingather" and cut off some of the edges…

… until y'all get the right width and height. (I'grand certain there are plenty other means to exercise this, I just figured out this is the best way for me to exercise this to become the all-time upshot.)

I'thousand using Bicubic (smooth gradients) every bit setting here. Now the gif has the right size and we can kickoff editing.

First of all I add "Acuminate" to my layers.
Filter > Sharpen > Selective Sharpening

I usually use these settings for all of my gifs but sometimes it maybe looks improve if you just use 0,ii every bit Radius (specially on 720p videos a smaller radius volition look meliorate).

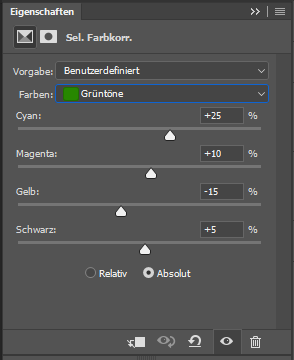
I start with adding some Brightness/Contrast. Subsequently that I add Selective Color.


(Look at all those horrible cropped screenshots, yeeh)

At present I add Curves.

I also add Levels and Color Rest.

Shadows,

Midtones

and Highlight.

At terminal I add together Exposure.
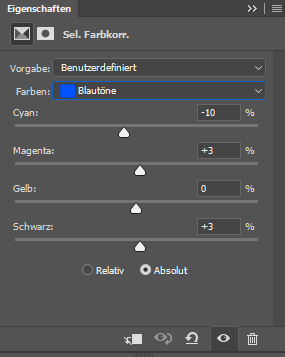
I wasn't satisfied with the outcome so far so I added a second layer of Brightness/Dissimilarity and Selective Color with a fiddling change in the settings. Experience free to add as many adjustment layers as yous want. Practice is the all-time way to get better at making gifs and look at me, I still accept no idea what I'm actually doing, I only play around with layers and settings.

The last step is of course to save the gif.
File > Consign > Salve for Spider web
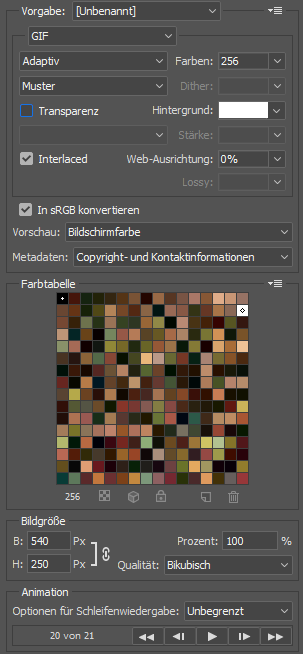
I always use these settings for saving my gifs.
Adaptive, Blueprint, Transparency not checked (if your gif is too big you tin select it to reduce the size), Interlaced ticked and nearly of import is to cull Forever under Animation.
Now y'all can save it as gif and tada!

Nosotros're done!
If you have any questions feel gratuitous to ask me. I hope this was helpful for anyone out there, ha.
newmanengifiricent1983.blogspot.com
Source: https://magnetosmind.tumblr.com/post/158794923109/how-to-make-high-quality-gifs
Post a Comment for "How to Upload High Quality Gif on Tumblr"